Project setup in Xcode6
In this post, I want to show you how I recommend configuring your Xcode project to satisfy the following common requirements:
- Ability to point the app at either your Test API or Production API
- Generate Test and Production API builds for TestFlight/HockeyApp
- Generate builds for the App Store
Everyone has their own opinion on how these things should be set up, and there’s a continuum from simple to complex that may be applicable for different situations, but at the least you may learn something here. And at best, you may copy my style verbatim. If I were to describe my setup, it is: As simple as possible, while still meeting the above requirements.
Oh, and if the images don’t work in your RSS reader, be sure to open this post on my blog. And if they’re too zoomed in, right click them and choose Open Image in New Tab (or whatever your browser’s equivalent is).
Dimensions
It helps to think of the various dimensions that are involved here:
- Test vs Production API
- Debug vs Release (debug=simulator/running tethered to Xcode vs release=archives/app store/testflight)
- Testflight vs App Store (only needed for release builds due to Xcode 6)
All the dimensions are unrelated to each other (orthogonal). Eg you will want a Test API build that runs in debug or release mode, and you’ll want a Production API build that runs in debug or release mode. The exception is the app store build - there’s no need a debug build for this one.
Xcode 6
Xcode 6 adds its own wrinkle to the picture. Previously, you could sign your Release build configuration archives with your App Store profile, and re-sign them with your Ad hoc profile for TestFlight/Hockey distribution (eg TestFlight’s desktop app re-signs them for you).
But that no longer works, because Apple’s added a new entitlement called ‘beta-reports-active’ to all the App Store profiles, for the purposes of the new 1000 Apple id’s beta testing distribution. And when you re-sign a build that has that entitlement with an Ad hoc profile that is missing the entitlement, it won’t install on your users devices. That’s a bit of a recent gotcha to beware. So this is why I’m creating a separate profile and scheme specifically for the App Store build.
Build configurations
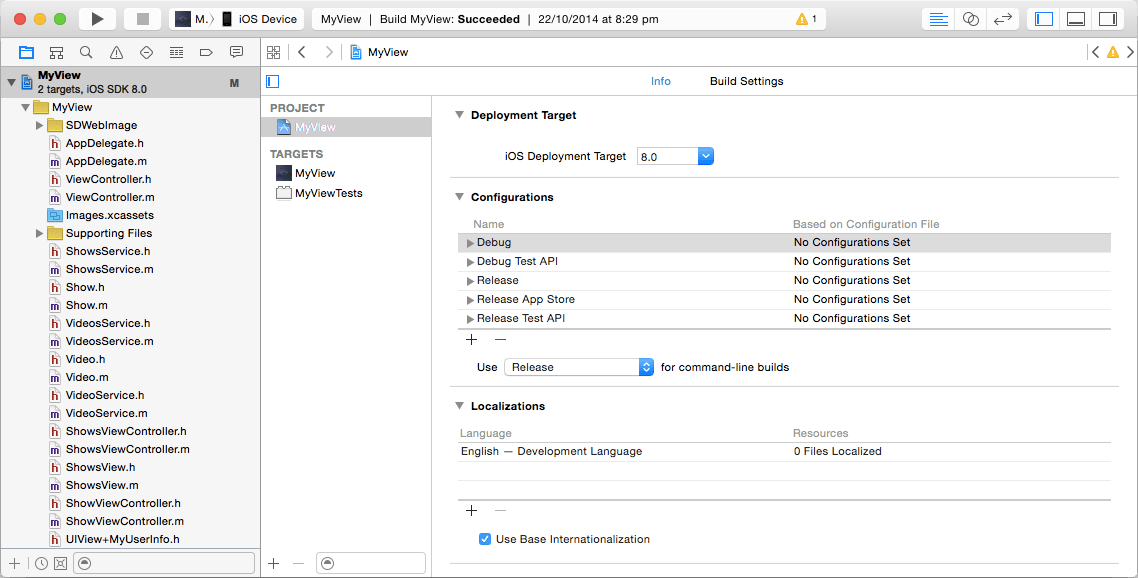
So now we can whittle it down to specifics. I recommend configuring your app to have the following build configurations:
- Debug (you don’t have to add this)
- Debug Test API (duplicate of Debug)
- Release (you don’t have to add this)
- Release Test API (duplicate of Release)
- Release App Store (duplicate of Release)
If you forget how to add build configurations, open the project in Xcode’s project navigator (the left pane), go to the project level, choose the Info tab, and click the ‘+’ button underneath Configurations.
If you want to simplify further, you don’t really need the App Store one - you can simply change Release’s provisioning profile prior to each time you make an app store release, and then revert the change immediately using Git. But I personally keep the App Store config.
If you’re using Cocoapods, keep in mind that whenever you add a build configuration you’ll need to run pod install again so it’ll automatically add the configurations to the pods project too.
It should look like this:
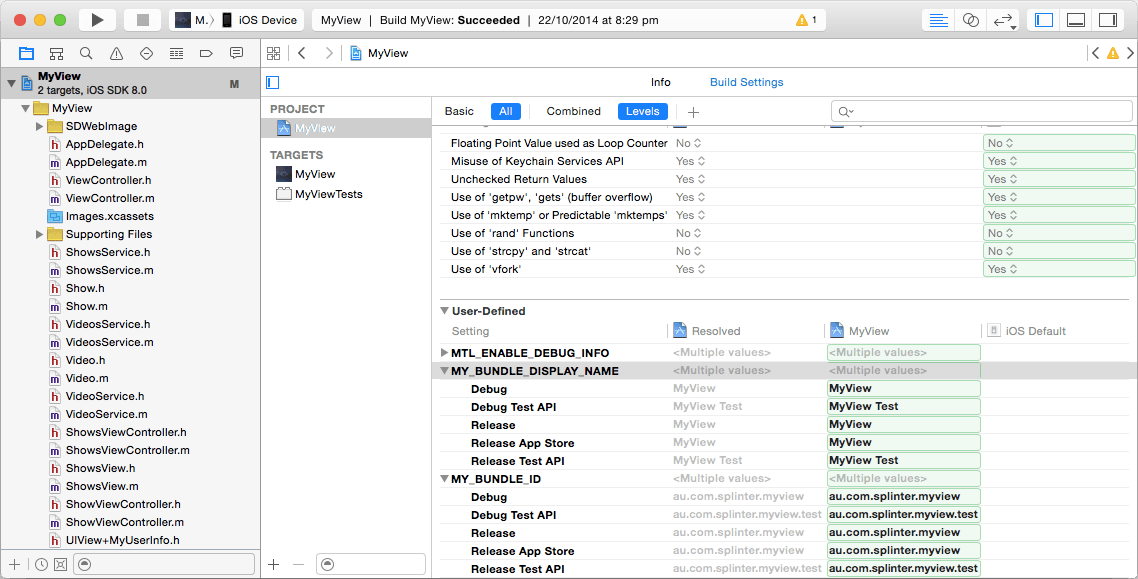
User-defined build settings
I use user-defined build settings to drive the different bundle id and bundle display name for each version of the app. This gives us the ability to keep the test and production API versions of the app separate in Testflight, and makes it easier for testers to know which version they’re using.
At the project level, select the ‘Build Settings’ tab, and select ‘All’ (not Basic), and ‘Levels’ (not Combined). We’ll next need to add a couple user-defined settings that we can vary per build configuration. From the menu, choose Editor > Add Build Setting > Add User-Defined Setting to add each setting. Once you’ve added the two settings, click the triangle next to them to expand them, so you can add different values for each build configuration.
Here’s the settings I recommend:
- MY_BUNDLE_DISPLAY_NAME
- Debug = MyApp
- Debug Test API = MyApp Test
- Release = MyApp
- Release App Store = MyApp
- Release Test API = MyApp Test
- MY_BUNDLE_ID
- Debug = com.mycompany.myapp
- Debug Test API = com.mycompany.myapp.test
- Release = com.mycompany.myapp
- Release App Store = com.mycompany.myapp
- Release Test API = com.mycompany.myapp.test
It should look like this:
Of course, these user-defined settings on their own won’t make a lick of difference to your bundle id/name, I’ll get into applying them to your Info.plist in a few paragraphs.
Other build settings
You’ll also need to set some further build settings for code signing and preprocessor macros.
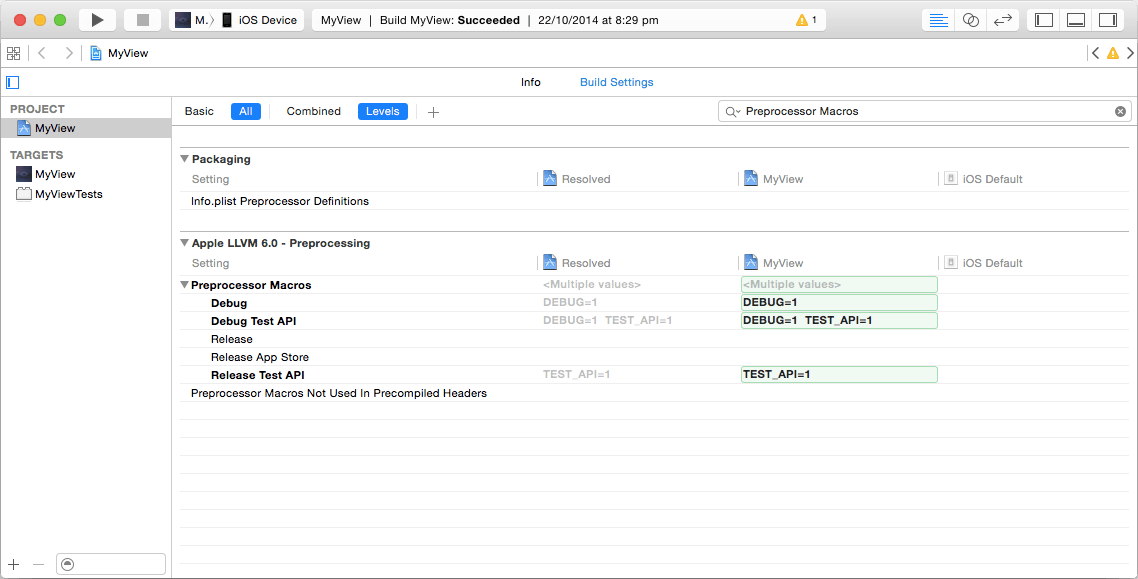
Preprocessor Macros
Firstly, the simple ones: Navigate to the project-level settings, select the Build Settings tab, and search for ‘Preprocessor Macros’. You simply need to change the two Test API ones to include TEST_API=1. Note that the ‘Debug Test API’ configuration should already have DEBUG=1 set, which you do not want to overwrite, you want to add TEST_API to that. Note that this macro has ‘API’ in the name, and is not simply ‘TEST’ - this is to emphasise the fact that this is intended to influence the API dimension only. These macros are used to make the app talk to your different backends, which I’ll describe in a later paragraph. It should look like the following:
Code Signing
Next, you need to configure your code signing. Firstly, I recommend visiting ~/Library/MobileDevice/Provisioning Profiles, inspecting all your profiles using Provisioning Quick Look Generator, and deleting all the ones that you don’t need. I even go so far as to put it in my Finder’s sidebar and tidying this folder often. It really pays dividends when it comes to making sure Xcode signs your code predictably - I’m never left scratching my head wondering ‘what did Xcode just do?’ when it comes to code signing, which is where you should be as a professional. But I digress.
After removing the junk, you’ll want to create two distribution provisioning profiles (unless you already have them) in the Apple Member Center - one for your Ad Hoc distribution (or an enterprise one if you’re lucky), and one for App Store distribution. I recommend calling them ‘MyCompany TestFlight’ and ‘MyCompany App Store’. Download them, then double-click to install them. You’ll see them appear in the aforementioned library folder.
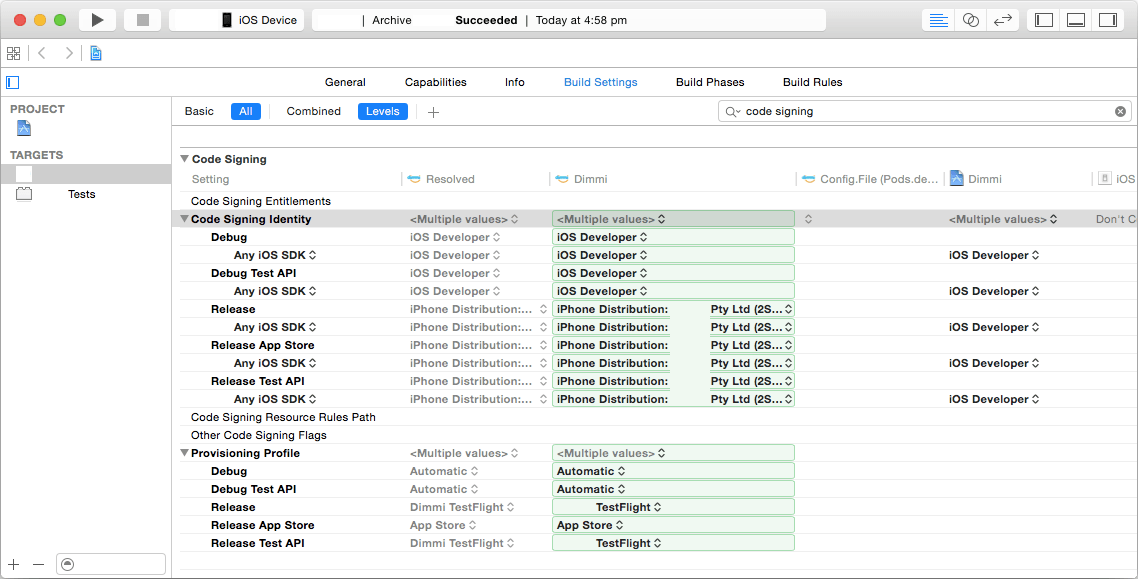
Once you’ve culled your installed provisioning profiles down to just what you need, then go into your target level build settings, and set the following:
- Code Signing Identity
- Debug / Debug Test API = Automatic iOS Developer
- Release / Release Test API / Release App Store = iPhone Distribution: MyCompany
- Provisioning Profile
- Debug / Debug Test API = Automatic
- Release / Release Test API = MyCompany TestFlight
- Release App Store = MyCompany App Store
It should look like this:
Info.plist
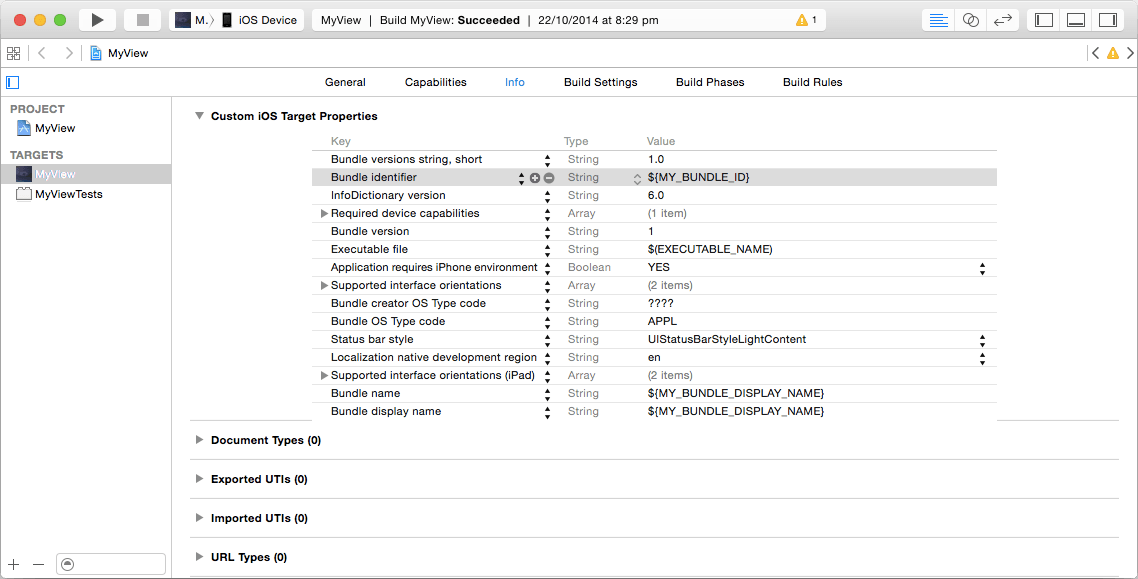
You’ll recall earlier that we created user defined build settings to vary the bundle id/name between build configurations. We need to change the Info.plist as follows so that these settings will be used:
- Bundle identifier = ${MY_BUNDLE_ID}
- Bundle name = ${MY_BUNDLE_DISPLAY_NAME}
- Bundle display name = ${MY_BUNDLE_DISPLAY_NAME}
It should look like this:
Code
In your code, wherever you make your API calls, you’ll need some kind of constant to use as the base URL for API calls. You’ll want to use #if to drive different base URLs for the test API, using the preprocessor macros you set earlier on the test api build configurations:
#if TEST_API
    static NSString *kBaseUrl = @"http://api-test.mycompany.com/v1/";
#else
    static NSString *kBaseUrl = @"https://api.mycompany.com/v1/";
#endif
Notice that the DEBUG macro has no bearing on whether you’re pointing at the test API or not. We want to keep these dimensions orthogonal as mentioned earlier.
Schemes
You’ll want to make a few schemes to make it easy to choose the build configurations. I make the following three:
- MyApp Prod API
- Run build configuration: Debug
- Test build configuration: Debug
- Profile build configuration: Release
- Analyze build configuration: Debug
- Archive build configuration: Release
- MyApp Test API
- Run build configuration: Debug Test API
- Test build configuration: Debug Test API
- Profile build configuration: Release Test API
- Analyze build configuration: Debug Test API
- Archive build configuration: Release Test API
- MyApp App Store
- Run build configuration: Debug
- Test build configuration: Debug
- Profile build configuration: Release
- Analyze build configuration: Debug
- Archive build configuration: Release App Store
When creating these three schemes, I make sure to check ‘Shared’ against them in the ‘Manage Schemes’ screen, so that they can be checked into Git.
Further thoughts
In the project settings, at target level, the General tab, under the Identity heading, there is a setting for Team. I set this to ‘none’ because I use my personal account for the tethered debugging provisioning profile. But you may want to use all your profiles from the same team, in which case you’ll want to set this, as it drives the automatic code signing to be more specific.
Use a wildcard profile for the Ad hoc Testflight provisioning profile if you can get away with it, so you don’t have separate ones for your *.myapp and your *.myapp.test bundle ids.
That’s all for tonight, I hope this has been helpful!
Thanks for reading! And if you want to get in touch, I'd love to hear from you: chris.hulbert at gmail.

Chris Hulbert
(Comp Sci, Hons - UTS)
Software Developer (Freelancer / Contractor) in Australia.
I have worked at places such as Google, Cochlear, CommBank, Assembly Payments, News Corp, Fox Sports, NineMSN, FetchTV, Coles, Woolworths, Trust Bank, and Westpac, among others. If you're looking for help developing an iOS app, drop me a line!
Get in touch:
[email protected]
github.com/chrishulbert
linkedin
